
This post contains affiliate links. If you buy through one of our links, we may earn a commission at no extra cost to you.
If your cucumbers, pole beans, or tomatoes are sprawling across the bed and stealing space from everything else, a cattle panel trellis solves that problem fast. It is one of the sturdiest ways to add vertical growing space to a raised bed, small yard, or tight urban lot. Squash, melons, and even cut flowers can climb one too, which frees up ground space for the rest of your garden. Instead of flimsy stakes that lean by July, a cattle panel gives you a rigid structure that holds up through a full Zone 8A growing season, storms included.
This guide walks you through building a cattle panel trellis from the ground up, whether you want a full arch between two raised beds, a vertical wall along a fence line, or a simple lean-to for a single row of vines. You will also find crop recommendations, spacing tips, and the mistakes that trip up most first-time builders.
Quick Answer: How to Build a DIY Cattle Panel Trellis
To build a cattle panel trellis, you need one cattle panel, two to four T-posts, and wire, clips, or heavy-duty zip ties to hold everything together. Start by anchoring the T-posts into the ground or into the corners of your raised beds. Next, bend the cattle panel into an arch between the posts, or mount it flat if you want a vertical trellis instead. Secure the panel tightly to each post so it cannot shift once vines add weight. Plant vining crops like cucumbers, beans, or squash along the base of the trellis and train the young growth up the panel as it climbs. Most crops take over the climbing on their own within a few weeks.
The rest of this guide covers each step in detail, along with material lists, spacing charts, and crop-specific advice for Zone 8A gardens.
What Is a Cattle Panel Trellis?
A cattle panel trellis uses livestock fencing, originally built to contain cattle and hogs, as a rigid support structure in the garden. Cattle panels are made from thick, galvanized welded wire, which makes them strong enough to hold heavy vines without sagging or bowing the way lighter trellis netting does.
A common size sold for livestock fencing runs about 16 feet long and 50 inches tall, built from galvanized welded wire. That length is long enough to bend into a full arch spanning two raised beds, or to cut down into shorter sections for other configurations.
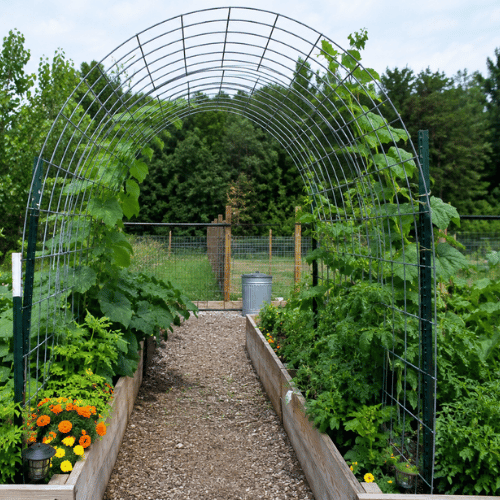
Gardeners use cattle panels in a few main configurations: bent into a tall arch over a path, mounted flat against a fence or bed edge as a vertical wall, angled into a lean-to against a structure, or curved into a tunnel over a single raised bed. Each version works a little differently depending on your space and what you are growing.
Best Cattle Panel Trellis Designs
A cattle panel trellis is less about looks and more about reclaiming ground space during the hottest, most crowded stretch of a Zone 8A summer. Once vining crops start climbing instead of sprawling, you free up bed space for lower-growing plants and make room for a lot more food in the same footprint. Before you start building, it helps to know which design fits your garden layout. Here is how the main options compare.
| Design | Best For | Difficulty | Materials | Pros | Cons |
|---|---|---|---|---|---|
| Arch trellis | Two raised beds with a path between them | Moderate | 1 full panel, 4 T-posts | Maximum vertical space, walk-through access, striking visual | Needs two people to bend safely, takes up path width |
| Vertical trellis | Fence lines, bed edges, tomato rows | Easy | 1 full or cut panel, 2 to 3 T-posts | Simple build, no bending required, good for beginners | Less growing surface than an arch |
| Lean-to trellis | Beds where one side needs open access | Easy to moderate | 1 panel, 2 T-posts, angled support | Space-saving, keeps one side clear for harvest | Less stable in high wind if not anchored well |
| Raised bed tunnel | Single raised bed, photo-friendly gardens | Moderate | 1 full panel, 4 anchor points | Most visually striking, works well for cut flowers | Covers most of the bed, limits access to plants underneath |
Option 1: Cattle Panel Arch Trellis
The arch trellis is the most popular design for good reason. Bending a full panel between two raised beds creates a tall, walk-through structure that turns wasted path space into growing space, which matters most during peak summer heat when cucumbers, pole beans, gourds, and climbing flowers are putting on the most growth. It is the design covered in the step-by-step section below, and it is best for raised beds with a path between them.
Option 2: Vertical Cattle Panel Trellis
If you do not want to deal with bending a panel, mount it flat against T-posts along a bed edge or fence line instead. Skipping the bend makes this the easiest design to build solo, and it works especially well as a cattle panel trellis for tomatoes, where a flat, stable surface gives you plenty of room to clip and tie stems as the plant grows. If an arch feels like more project than you want to take on, this is the faster route to a working trellis.
Option 3: Lean-To Cattle Panel Trellis
A lean-to angles the panel against a fence, shed wall, or set of posts, leaving one side of the bed fully open. It is the most space-saving option of the four, since it adds vertical growing room without claiming a second anchor point or a walking path the way an arch does. This works especially well when you need to keep one side of the bed clear for regular harvest access.
Option 4: Raised Bed Cattle Panel Tunnel
Curving a panel over a single raised bed creates a tunnel effect that is the most visually striking of the four designs, and it is the option that tends to perform best for Pinterest boards and social photos once it fills in with vines or flowers. It is a favorite for cut flower beds and other photo-friendly layouts, though the coverage does limit access to the plants growing underneath.
Materials You'll Need
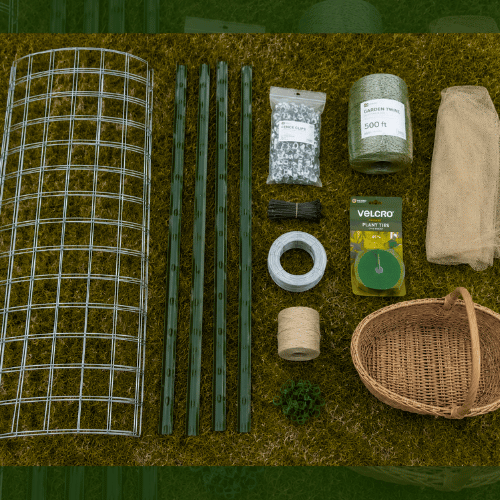
Most of these items are easy to source locally or online, with one exception. Cattle panels themselves are usually bought locally at a farm supply or feed store, since shipping a full 16-foot panel is often impractical. Check availability at a store near you before planning your build day. For securing the panel to your posts, heavy-duty UV-resistant zip ties Shop heavy-duty zip ties hold up better outdoors than standard ones, though they work best paired with wire or fence clips rather than used alone. If you are refreshing the bed's soil before planting, working in finished compost from a compost bin is a good step to take before the trellis goes in.
| Item | Quantity | Purpose | Required or Optional |
|---|---|---|---|
| Cattle panel | 1 per trellis | Main trellis structure | Required |
| T-posts or U-posts | 2 to 4 | Anchor the panel in the ground | Required |
| Fence clips, galvanized wire, or heavy-duty zip ties | 8 to 12 | Secure the panel to the posts | Required |
| Soft plant ties or clips | As needed | Train vines onto the panel | Required |
| Garden twine | 1 roll | Tie tomatoes, flowers, and young vines | Required |
| Plant sling material or mesh produce bags | As needed | Support heavy melons or squash | Optional, melon and squash growers only |
| Harvest basket | 1 | Collect produce once vines start climbing | Optional |
Tools You'll Need
You likely have some of these already. A few are worth buying if you plan to build more than one trellis or work with heavier gauge wire.
- T-post driver
 Sekcen Fence Post Driver T Post Driver with Handle Metal Pounder Rammer for U Channel Wooden Fence 8LB
- POST DRIVER: This high-quality fence post driver makes it easy for you to drive fence posts deep into the ground. Works best with T-Posts, U-Posts, wood, metal or any types of fence posts.
- ERGONOMIC DESIGN: Using a post driver allows posts to securely be hammered into the ground without damaging the posts. The post driver features a handle on each side of the driver, making it is easy to maneuver.
- HEAVY DUTY: The t post driver is constructed of durable, powder-coated steel, and is rust and corrosion resistant, providing many years of service.
- EASY TO USE: Place the post pounder over the top of your post, lift and release until post is buried to desired depth.
- DIMENSIONS: Metal fence post driver length is 17 inch, width is 8.9 inch, inside diameter is 2.9 inch.
$28.98Buy on Amazon
- Work gloves Shop garden gloves
- Bolt cutters (for custom panel sizes)
 WORKPRO W017006A Bolt Cutter, Bi-Material Handle with Soft Rubber Grip, 24", Chrome Molybdenum Steel Blade 24" Bolt Cutter
- Drop forged chrome molybdenum steel and powder coated jaws for sure, efficient cutting and long life
- Classic lever-fulcrum design and precisely aligned blades deliver added leverage with less effort
- Ergonomic bi-material anti-slip grips provide greater control and comfort in cutting
- Cutting Capacity: HRC≤42: 5/16-inch(8mm Maximum);HRC<25: 25/64-inch(10mm Maximum)
- Ideal for cutting soft metal, bolts, rods, rivets and chain
$39.44Buy on Amazon - Wire cutters Shop wire cutters
- Tape measure
- Level
- Mallet
- Pruning snips
Before You Build: Where to Put the Trellis
Placement matters as much as the build itself. Before you drive a single post, think through sunlight, bed orientation, access, wind, the weight of a mature crop once it is loaded with fruit, the width of the walking path you need to keep clear, and how much shade the finished trellis will cast on nearby crops.
Put Tall Trellises Where They Won't Shade Shorter Crops
A cattle panel trellis can grow six feet tall or more once vines fill in, so placement affects the whole garden, not just the bed it sits in. UC Agriculture and Natural Resources guidance notes that taller vertical structures should be placed where they will not shade shorter, sun-loving crops, generally recommending the north or west side of a garden depending on your specific layout.
Install the Trellis Before Planting
It is easier and safer to set your trellis up before you plant, rather than trying to work posts and panels around established seedlings. UC Master Gardeners recommend placing trellises at planting time specifically to avoid damaging plant roots and stems later in the season. Installing the structure early gives you a clean, obstacle-free space to work while building, with no seedlings underfoot to worry about.
Step-by-Step: How to Build a Cattle Panel Arch Trellis
This is the main build, and it works well for two raised beds set a few feet apart with a walking path between them.
Step 1: Measure Your Bed Spacing and Path Width
Before you buy or bend anything, measure the distance between your two beds, or the width of the path if you are arching the panel over a walkway instead. A 16-foot panel typically creates a tall, generous arch when bent between two beds or across a path a few feet wide, but the exact height depends on how wide that gap is. The narrower the gap, the taller and steeper the arch. The wider the gap, the flatter and lower it sits. Measure twice before you commit, since this number decides how much clearance you will have to walk underneath once the arch is up.
Step 2: Drive Your T-Posts or U-Posts
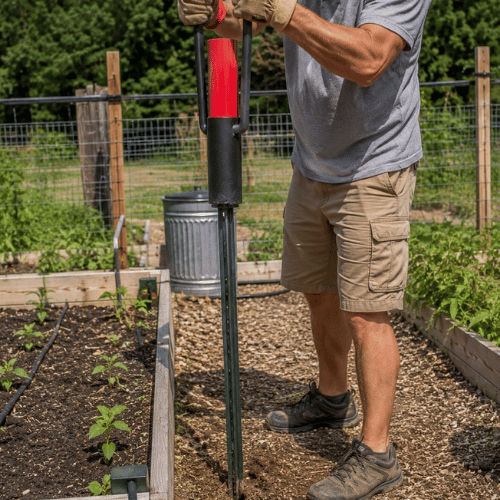
Plan for at least two posts per side, so four total for a full arch. Drive them into the ground at the corners of each bed, or just outside the bed frame if you are anchoring into open soil. In windy areas, drive posts deeper and consider adding extra posts for stability, since a fully grown arch covered in vines catches a lot of wind.
Step 3: Bend the Cattle Panel Into Place
This step goes much easier with two people. Lift one end of the panel and walk it toward the opposite bed while your helper guides the other end, letting the panel curve naturally into an arch. Cattle panels have real spring tension once bent, and the cut ends carry sharp wire edges, so wear gloves and keep hands clear of the panel's edges as it flexes into shape.
Step 4: Secure the Panel to the Posts
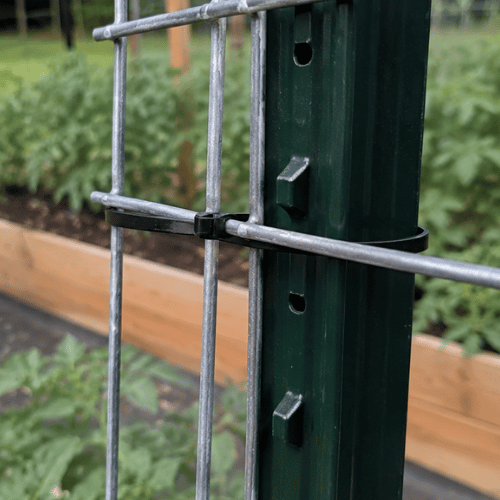
Attach the panel to each post using fence clips, galvanized wire, or heavy-duty UV-resistant zip ties. Zip ties alone can work, but they break down with sun exposure over time, so plan on a seasonal inspection to check for cracking or brittleness if you are not backing them up with wire or fence clips.
Step 5: Check Stability Before Planting
Once the panel is secured, give it a firm shake test from a few different points along the arch. Check that posts have not shifted, look over cut edges for anything sharp enough to snag skin or clothing, confirm the arch is not leaning to one side, and walk underneath to check that you have enough overhead clearance to move through comfortably once vines fill in. Fix any wobble now, before vines make the structure harder to access.
Step 6: Plant and Train Vines Up the Panel
Plant your crops along the base of the arch on the outside edges. Use soft ties or clips to guide young vines toward the panel early on. Most vining crops, especially cucumbers and beans, will grip the wire with their own tendrils once they get a foothold, and you can taper off manual training after the first few weeks. Newly planted vines need consistent watering while they establish, so having a reliable garden hose within reach of the bed makes this stage easier.
How to Build a Vertical Cattle Panel Trellis
If a full arch is more than your space needs, a vertical trellis is a faster build. Drive two to three T-posts in a straight line along a bed edge or fence line, spaced evenly apart. Instead of bending the panel, mount it flat against the posts and secure it the same way you would an arch, using fence clips, wire, or zip ties at each post. This design skips the two-person bending step entirely and works especially well for tomatoes or a single row of pole beans.
Best Crops for a Cattle Panel Trellis in Zone 8A
Most of the crops below can be direct seeded once the soil warms up, but if you want a head start on the season, starting seeds indoors with a seed starting kit lets you transplant established seedlings right at the base of the trellis once it is built.
| Crop | Season in Zone 8A | How to Train | Caution |
|---|---|---|---|
| Cucumbers | Spring and late summer/fall | Guide young vines to the panel, then let tendrils climb | None, one of the strongest fits for this trellis type |
| Pole beans | Spring and fall | Wrap the first few inches by hand, they climb readily after that | None |
| Tomatoes | Spring through summer | Clip and tie stems regularly as the plant grows | Needs consistent pruning and tying, not a self-climbing crop |
| Melons and winter squash | Late spring through summer | Guide vines up, then support developing fruit with slings | Heavier fruit needs sling support once it forms |
| Peas | Early spring and fall | Light guiding, tendrils grip quickly | A cattle panel may be more structure than peas actually need |
| Climbing flowers (morning glory, hyacinth bean, sweet peas, climbing nasturtium) | Spring through fall, varies by species | Guide young growth toward the panel | Confirm a variety is not considered invasive in your area before planting |
Cucumbers
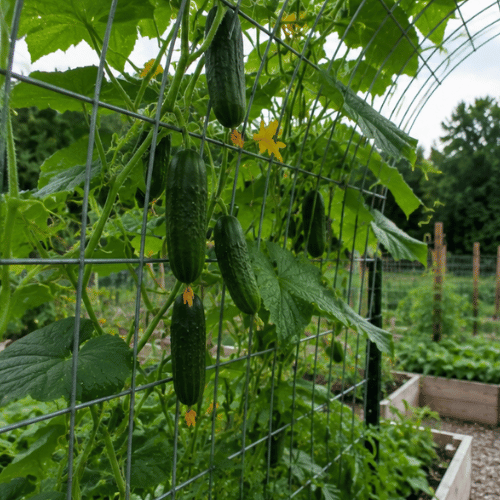
Cucumbers are the strongest match for a cattle panel trellis. Growing them vertically keeps fruit straighter and cleaner than letting vines sprawl across the ground, and it makes harvest far easier since you are not hunting through foliage at soil level. According to the Clemson Home & Garden Information Center, trellised cucumbers can be planted in rows about three feet apart, then thinned to roughly 9 to 12 inches apart within the row.
Pole Beans and Yardlong Beans
Pole beans climb naturally and produce heavily through the summer once established on a trellis. The Clemson Home & Garden Information Center lists pole beans as both a spring and fall crop in South Carolina planting windows, which makes a cattle panel trellis a structure you can put to use across two seasons rather than just one.
Tomatoes
Indeterminate tomato varieties can do well on a cattle panel trellis if you tie them well, but a cattle panel is not ideal as a standalone support for a heavy, sprawling plant unless you keep it pruned and clipped throughout the season. Plan to prune suckers and tie stems regularly as the plant grows, since tomatoes do not climb on their own the way tendril crops do. Left unpruned, a tomato plant can outgrow what ties and clips alone can manage.
Melons and Winter Squash
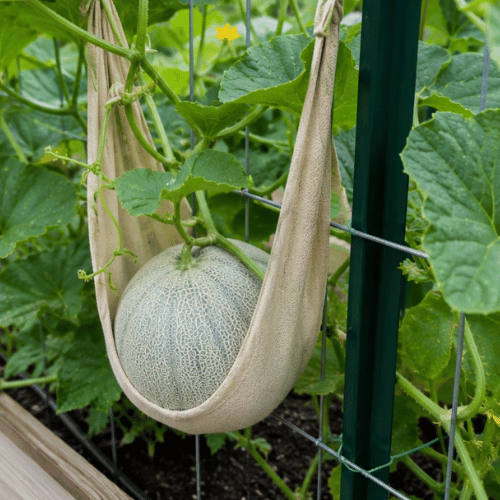
Smaller melon varieties and winter squash can be trellised successfully, but fruit weight becomes the deciding factor. University of Minnesota Extension recommends trellising vine crops with fruit up to about three pounds, and suggests using slings, such as mesh produce bags Shop mesh bags for fruit slings or fabric strips, to support developing fruit so the vine itself does not have to bear the full weight.
Peas
Peas grow well in Zone 8A during the cooler spring and fall windows, and they climb easily with light guidance. A full cattle panel is sturdier than most pea plants actually require, so if peas are your only crop, a lighter trellis option may be a better fit. If you are already building a panel trellis for cucumbers or beans, though, peas can share the structure in the off season.
Flowers
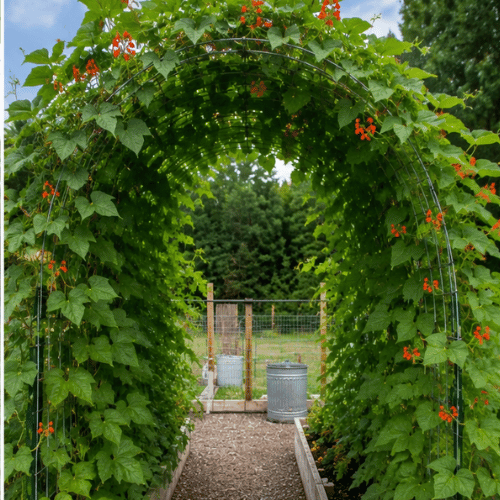
Climbing flowers like morning glories, hyacinth bean, black-eyed Susan vine, sweet peas, and climbing nasturtiums all take well to a cattle panel arch, and they are the crop most likely to turn a functional trellis into something worth photographing. A flower-covered arch draws attention in the garden and photographs well for sharing. Some of these vines can spread aggressively or become locally invasive, so it is worth checking a variety's status in your region before planting it against a permanent structure like this.
Zone 8A Planting Timing for a Cattle Panel Trellis
Plan to have your trellis built and anchored before your main planting window opens, ideally before cucumbers, beans, tomatoes, or squash go into the ground. The Clemson Home & Garden Information Center lists both spring and fall planting windows for cucumbers and pole beans in South Carolina, which supports building a cattle panel trellis you can put to work twice in one year rather than for just a few weeks each summer. Check our seed starting schedule generator for exact dates based on your specific location and the crop you are training up the trellis.
Cattle Panel Trellis Spacing and Layout Ideas
| Layout | Space Needed | Best Crop | Notes |
|---|---|---|---|
| Bed-to-bed arch | Two beds with a 3 to 5 foot path between them | Cucumbers, pole beans, gourds | Tallest, most dramatic design, needs a clear walkway underneath |
| Single-bed arch | One raised bed, panel curved end to end | Flowers, cut flower rows | Best for visual impact, limits access to the bed interior |
| Path tunnel | A garden path 3 to 4 feet wide | Mixed vining crops on both sides | Doubles as a shaded walkway once vines fill in |
| Vertical row | A straight run of 8 to 16 feet along a bed edge | Tomatoes, single-row beans | Simplest layout, easiest for solo installation |
| Fence-line setup | Along an existing fence | Mixed vining crops | Can attach directly to fence posts in some cases, reducing post count needed |
How to Train Plants on a Cattle Panel Trellis
Young vines usually need a little help finding the panel. Use soft plant ties or clips

- Durable Material: Made from high - quality, long - lasting plastic, these plant support clips are designed to withstand various weather conditions and the test of time, ensuring they can support your plants season after season.
- Easy to Use: Their simple and intuitive design allows for effortless installation. Just open the clip, place the plant stem in position, and close it gently. No special tools are required, making it convenient for both novice and experienced gardeners.
- Attachableand Flexible: Thanks to their innovative design and ability to be used in multiple connections,these clips hold securely on a wide range of plant stems , The inner surface of the clip is smooth and soft, which can not only hold firmly, but also will not scratch or damage the plant tissue, escorting the growth and development of the plant.
- Versatile Application: Ideal for a wide range of plants, including tomatoes, cucumbers, peppers, and climbing flowers. They can be used in gardens, greenhouses, or even indoor potted plants, meeting all your plant - supporting needs.
- Space - Saving Storage: The compact size of these plant support clips makes them easy to store. They can be neatly stacked or stored in a small container, taking up minimal space in your gardening tool collection when not in use.Each pack is hand-selected, removing the bad ones to ensure quality. The packaging uses vacuum sealing, with nice packaging, small size, and easy to store.
Once vines get a foothold, most tendril crops like cucumbers, beans, and peas take over the climbing on their own. Prune back any growth that is heading in an unhelpful direction, and keep a clear harvest path in mind as the plant fills in, since a fully covered panel can make it harder to spot ripe produce tucked against the wire. A

- 2 Sizes Harvest Baskets Available: Large picnic basket dimensions: 15.7" L x 9.5" W x 7.2" H / 39.9 x 24.2 x 18.2 cm, small garden harvest basket dimensions: 9.8" L x 9.8" W x 7" H / 25 x 25 x18 cm; appropriate size can meet your different storage needs; easy to assemble with provided hardware
- Durable and Reliable Garden Basket: Crafted from durable steel mesh with surface paint finish which can withstand the demands of gardening tasks; foldable wooden handle design for easily transport
- Good in Air Permeability: Portable garden basket ventilates to keep food fresh longer; kind reminding: use a dry cloth to wipe the basket if it is wet for longer use
- Square and Rectangular Base: Metal baskets for organizing features a stable base, it will place securely on any type of shelf, worktop, table and flat surface; stylish black rectangle mesh basket for decorating your kitchen, living room, dining room
- Widely Used: Suitable vegetable picking basket for storing fruits, desserts and vegetables when you go for a picnic and shopping; ideal choice for your home organization needs and also great for Easter or a Halloween costume
Common Mistakes to Avoid
| Mistake | What Happens | Better Approach |
|---|---|---|
| Using weak or shallow posts | Trellis leans or falls once vines add weight and wind catches the foliage | Drive posts deep, use at least two per side, and add extra posts in windy spots |
| Installing the trellis too late | Roots and young stems get damaged while working posts around established plants | Build and anchor the trellis before planting |
| Placing it where it shades other crops | Sun-loving plants nearby get stunted growth from the trellis's shadow | Position tall trellises on the north or west side of the garden where possible |
| Relying on zip ties alone | Ties break down from UV exposure over a season and the panel loosens | Back up zip ties with wire or fence clips, and inspect regularly |
| Ignoring sharp cut edges | Exposed wire ends can scratch hands, snag clothing, or catch curious kids and pets | File or cap sharp edges, and position the panel so cut ends face away from foot traffic |
| Skipping wind anchoring | A fully grown, vine-covered panel acts like a sail and can topple in storms | Anchor posts deeper than feels necessary, especially for arch designs |
| Planting heavy melons without support | Fruit weight pulls vines down or snaps stems | Use slings or mesh produce bags for fruit over a few pounds |
Cattle Panel Trellis Cost: What to Budget For
Prices vary by region and change over time, so use these as a general planning range rather than exact numbers. A standard 16-foot by 50-inch, 4-gauge galvanized cattle panel typically runs somewhere in the $35 to $45 window at major farm and hardware retailers, with Tractor Supply, The Home Depot, and Lowe's generally landing close to that same range. T-posts typically run $5 to $12 each depending on height and weight, and a full arch usually calls for around four of them. Hardware like fence clips, wire, or zip ties adds a modest amount on top. Check current pricing at a retailer near you before you buy to get exact numbers for your area.
FAQs About DIY Cattle Panel Trellises
How big is a cattle panel?
A standard cattle panel commonly sold for livestock fencing runs about 16 feet long and 50 inches tall, though exact sizes can vary by manufacturer and retailer.
How tall is a cattle panel trellis?
Cattle panel trellis dimensions depend on the panel length, your bed spacing, and how wide you build the arch. A standard 16-foot panel can create a walk-through arch several feet tall when bent between two beds set a few feet apart.
How wide should a cattle panel arch be?
Wide enough to leave room for the path and easy crop access underneath, but narrow enough that the panel still forms a stable, well-supported arch rather than a flat, low curve.
Which direction should a cattle panel trellis face?
There is no single required direction, but positioning the trellis on the north or west side of the garden is a common recommendation. That placement keeps the tall structure from casting shade over shorter, sun-loving crops as the sun moves across the sky during the day.
Can you use cattle panels for cucumbers?
Yes. Cucumbers are one of the best crops for this trellis type because they climb readily, save significant garden space, and are easier to harvest when the fruit hangs at eye level instead of resting on the ground.
Can you grow tomatoes on a cattle panel trellis?
Yes, especially indeterminate varieties, but they need more attention than cucumbers or beans. Plan on regular clipping, pruning, and tying as the plant grows, since tomatoes do not climb on their own.
Can cattle panels hold squash or melons?
Smaller-fruited varieties can work well, including watermelon on a well-anchored cattle panel trellis. Larger, heavier fruit may need sling support made from mesh produce bags or fabric strips, or may do better grown along the ground instead.
Do cattle panels rust?
Galvanized panels are built to hold up outdoors, so a cattle panel does not rust easily under normal use. Cut edges and scratches in the coating can eventually show rust over time, but this is mostly cosmetic and does not typically affect the structure's strength.
Are cattle panels safe for raised beds?
Yes, a cattle panel trellis works well with a raised bed when it is anchored securely and positioned so sharp cut edges are not in the path of hands, clothing, or curious kids and pets.
How do you secure a cattle panel trellis?
Use T-posts or U-posts as anchors, then attach the cattle panel to the T-post with wire, fence clips, or heavy-duty zip ties. Combining zip ties with wire or clips holds up better over a full season than zip ties alone.
Should I install the trellis before or after planting?
Before planting is the better approach. Installing the structure early avoids damaging roots or young vines once they are established in the bed.
What can I plant under a cattle panel arch?
Lower-growing, shade-tolerant options like herbs, lettuce, and basil can work well underneath an arch, as long as they still get enough filtered sunlight once the vines above fill in.
How much does a cattle panel cost?
Pricing varies significantly by region, retailer, and current material costs, and cattle panels are typically a local farm supply purchase rather than something ordered online. Check with a farm supply or feed store near you for current pricing before you set a budget for the project.
Where can I buy a cattle panel for a trellis?
Farm supply stores and feed stores are the most common source, since shipping a full-length panel is often impractical. Depending on your area, some agricultural supply retailers may carry them as well.
Build It Once, Use It for Multiple Seasons
A cattle panel trellis is one of those projects that pays off well beyond the first planting. Once it is anchored and secure, you can rotate spring and fall crops through it, swap cucumbers for pole beans, or move from a summer squash arch into a fall pea trellis, all on the same structure. Pair it with a Zone 8A planting calendar to time your plantings, and check a cucumber growing guide or pole bean growing guide for crop-specific care once your vines are climbing. If you are getting a jump on the season by starting seeds indoors first, our best LED grow lights guide can help you pick a setup before you transplant seedlings out to the trellis. And if you are setting up a new bed for this project, our raised bed soil guide can help you get the mix right from the start.